How to Set Up Free Proxy for Janitor AI with MegaNova in 2026
Learn how to configure a free MegaNova proxy for Janitor AI by setting up model names, API endpoints, and authentication keys step-by-step.
This page may contain affiliate links. We may earn a commission at no extra cost to you. Full disclosure.
Introduction
Proxy integration connects Janitor AI directly to MegaNova's free-tier AI models, eliminating the need for premium API subscriptions. This setup routes all conversation requests through MegaNova's infrastructure, giving you access to their language models while maintaining Janitor AI's character-driven interface. By following this guide, you'll have a fully functional proxy configuration that leverages MegaNova's capabilities at no cost.
This tutorial covers every step from accessing Janitor AI to retrieving MegaNova credentials and saving your final configuration. You'll retrieve the necessary credentials from MegaNova's developer console and properly format them within Janitor AI's proxy settings. Whether you're new to API integrations or looking to reduce costs, this guide provides the exact sequence needed for a successful setup.
- 01Navigate to Janitor AI and select a character to open the chat interface
- 02Click the hamburger menu and open **API Settings**
- 03Locate the **Proxy** tab and click **Add Configuration**
- 04Log into MegaNova and retrieve the **Model Name** from the API console
- 05Copy the **Proxy URL** and **API Endpoint** from MegaNova
- 06Paste all credentials into Janitor AI's proxy configuration form and add the "/chat/completions" endpoint path
- 07Click **Save Settings** to activate the proxy
Navigate to the Janitor AI Platform
Access the Janitor AI website where you'll configure all proxy settings.
Look for the official Janitor AI website near the top of the search results.
This step corresponds to the [0:06] mark in the video where access to the Janitor AI interface begins.

Access the Janitor AI website where you'll configure all proxy settings. Open any modern web browser—Chrome, Firefox, Edge, or Brave all work equally well. Use your search engine to find "Janitor AI" and press Enter.
Look for the official Janitor AI website near the top of the search results. Click the official link to reach the Janitor AI platform, taking care to visit the legitimate site to avoid phishing attempts or unofficial mirrors. The official site displays a clean, professional interface with character selection options visible on the homepage.
This step corresponds to the 0:06 mark in the video where access to the Janitor AI interface begins.
Select a Character to Access Chat Interface
The Janitor AI homepage displays a variety of AI characters available for conversation.
Accessing the chat interface is essential because Janitor AI restricts API configuration options to active chat sessions.
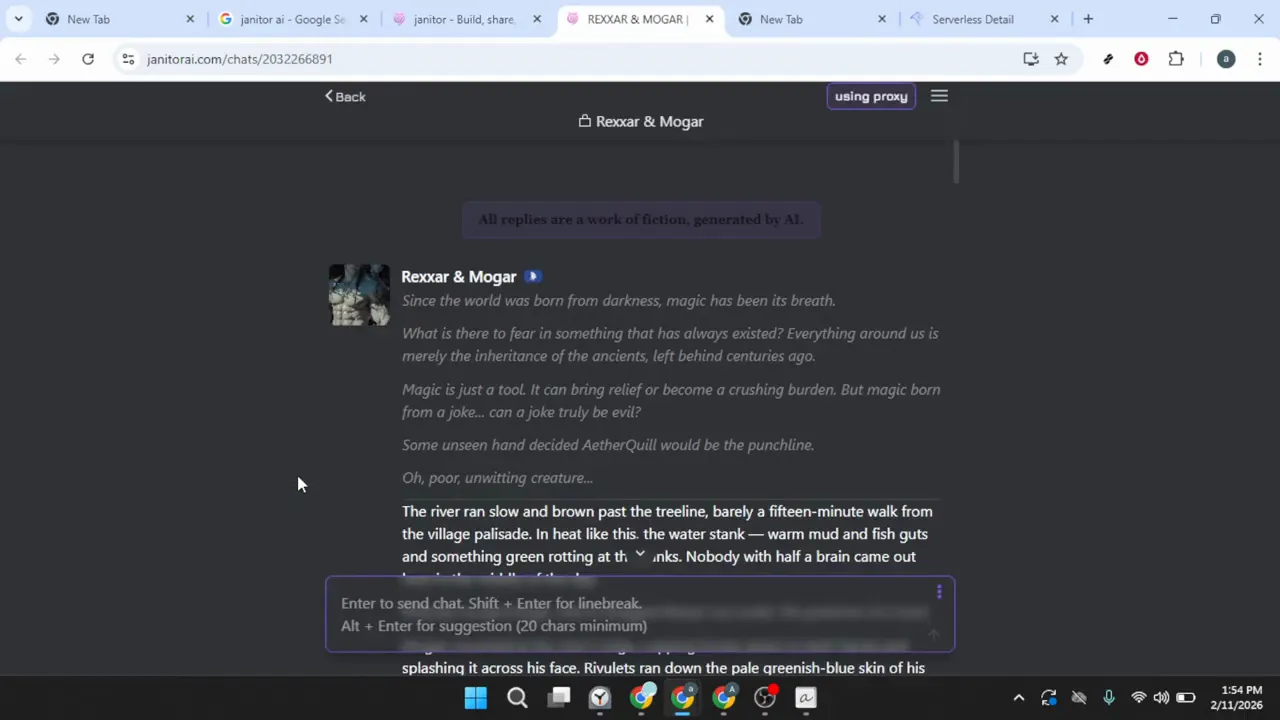
The Janitor AI homepage displays a variety of AI characters available for conversation. Browse the available characters and click on any one that interests you—the specific character you choose doesn't affect proxy configuration. Clicking a character opens the chat interface window where you can access API and proxy settings through the menu system.
Accessing the chat interface is essential because Janitor AI restricts API configuration options to active chat sessions. You need not send any messages or interact with the character at this stage; simply opening the chat interface provides access to the settings menu required for the next steps, as shown at the 0:23 mark in the video.
Open the API Settings Menu
With the chat interface visible, locate the three horizontal lines stacked on top of each other in the top-left corner—the hamburger menu icon.
Locate and select API Settings or a similarly named option referencing API configuration.
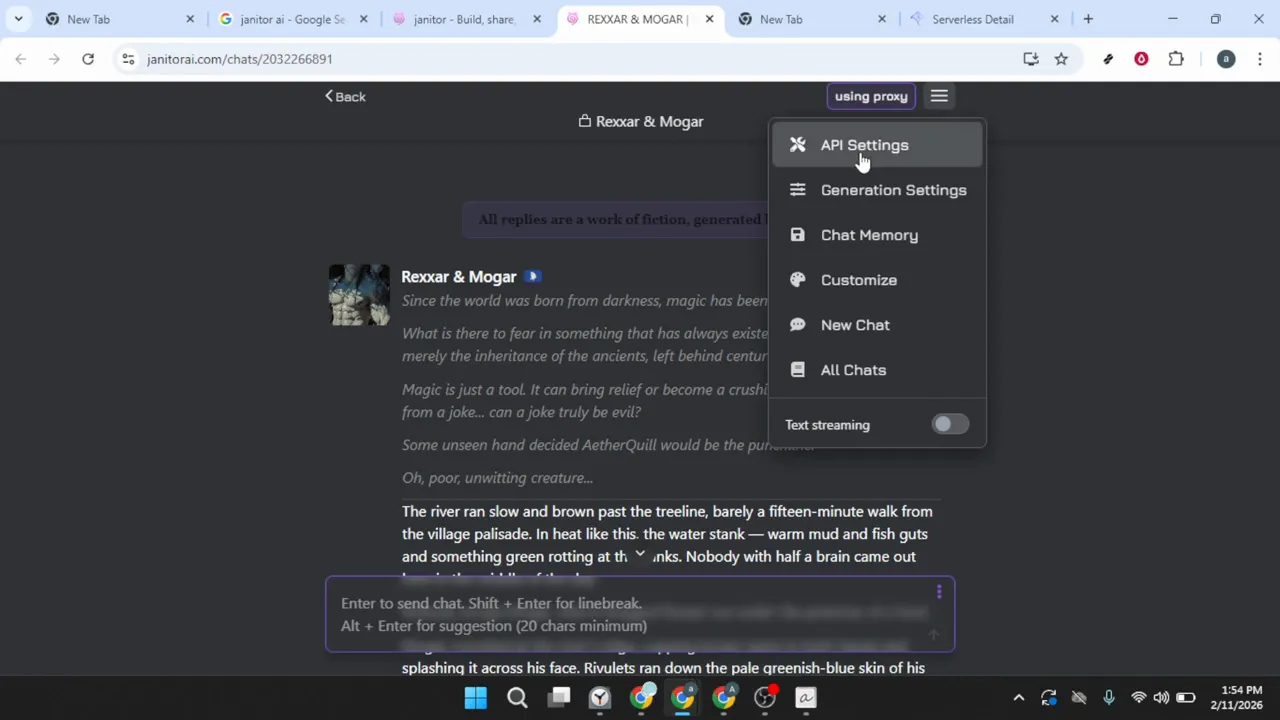
With the chat interface visible, locate the three horizontal lines stacked on top of each other in the top-left corner—the hamburger menu icon. This universal navigation symbol is your gateway to Janitor AI's configuration options. Click the hamburger menu icon to expand the navigation panel, revealing various menu options available within Janitor AI.
Locate and select API Settings or a similarly named option referencing API configuration. Click API Settings to enter the configuration area, where you can connect external AI services, configure proxy routes, and manage authentication credentials. The interface displays various tabs or sections related to API management, explored in the following steps as demonstrated in the [0:23–0:35] timestamp range in the video.
Create a New Proxy Configuration
Within the API Settings area, locate the tab labeled Proxy or Proxy Settings and click on it.
Look for a button or link labeled Add Configuration, New Configuration, or similar terminology.
One of the first fields is a name field for your configuration.
Within the API Settings area, locate the tab labeled Proxy or Proxy Settings and click on it. This section is distinct from direct API connections and is specifically designed for routing requests through intermediary services like MegaNova. The proxy section will display any existing configurations or appear empty if this is your first setup.
Look for a button or link labeled Add Configuration, New Configuration, or similar terminology. This button is typically prominently displayed and easy to locate. Click it to begin creating a new proxy setup; a form or dialog box will appear requesting the necessary information to establish the proxy connection, as shown at the [0:35] mark in the video.
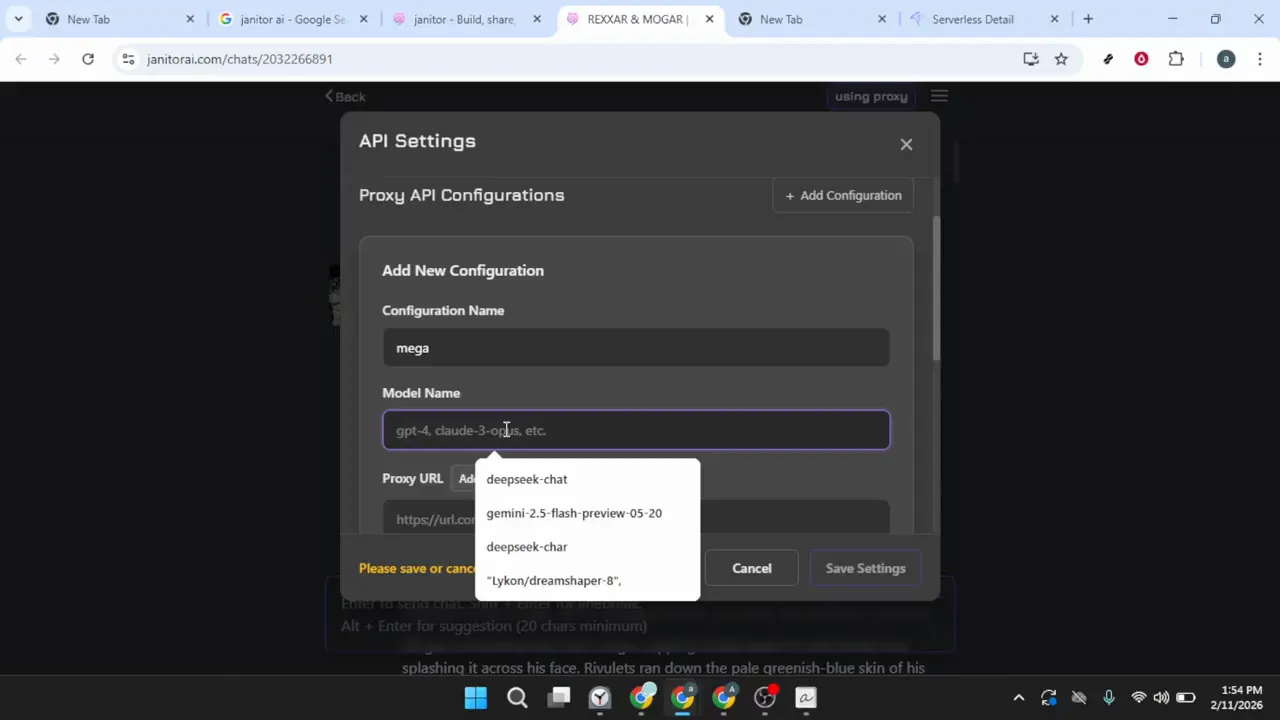
One of the first fields is a name field for your configuration. Enter a descriptive, memorable name—something like "MegaNova Free Proxy" or "MegaNova 2026" works well. This name is purely organizational and helps you identify this configuration if you later create multiple proxy setups.
Retrieve the Model Name from MegaNova
Gather the specific technical details from MegaNova that Janitor AI requires to establish the proxy connection.
Log into your MegaNova account using your existing credentials.
Look for a navigation section, sidebar, or menu containing API-related options.
Gather the specific technical details from MegaNova that Janitor AI requires to establish the proxy connection. Open a new browser tab while keeping your Janitor AI configuration page open. Search for "MegaNova AI" and navigate to the official MegaNova website.
Log into your MegaNova account using your existing credentials. If you lack a MegaNova account, create one before proceeding—the registration process is straightforward and free. Once logged in, access the MegaNova dashboard or main interface.
Look for a navigation section, sidebar, or menu containing API-related options. Labels like API, Developer, API Console, or API Keys indicate the correct section. Click this area to access the API management interface.
Within the API section, MegaNova displays critical information about their AI models and endpoints. Locate the field labeled Model Name or Model ID showing the specific identifier for the AI model you'll use. This identifier typically resembles "meganova-chat-v2" or similar technical text.
Select and copy this model name exactly as it appears—precision is crucial, as even a single character difference causes proxy connection failure. Use your mouse to highlight the entire model name, then right-click and select Copy, or use Ctrl+C (Windows/Linux) or Cmd+C (Mac). This step corresponds to the [0:58–1:23] section of the video where the model identifier is retrieved.
Configure the Proxy URL and Endpoint
Switch back to the Janitor AI browser tab where your proxy configuration form is open.
Visually verify that the model name appears complete and correct with no extra spaces before or after the text.
Switch back to your MegaNova browser tab, ensuring you remain in the API section.

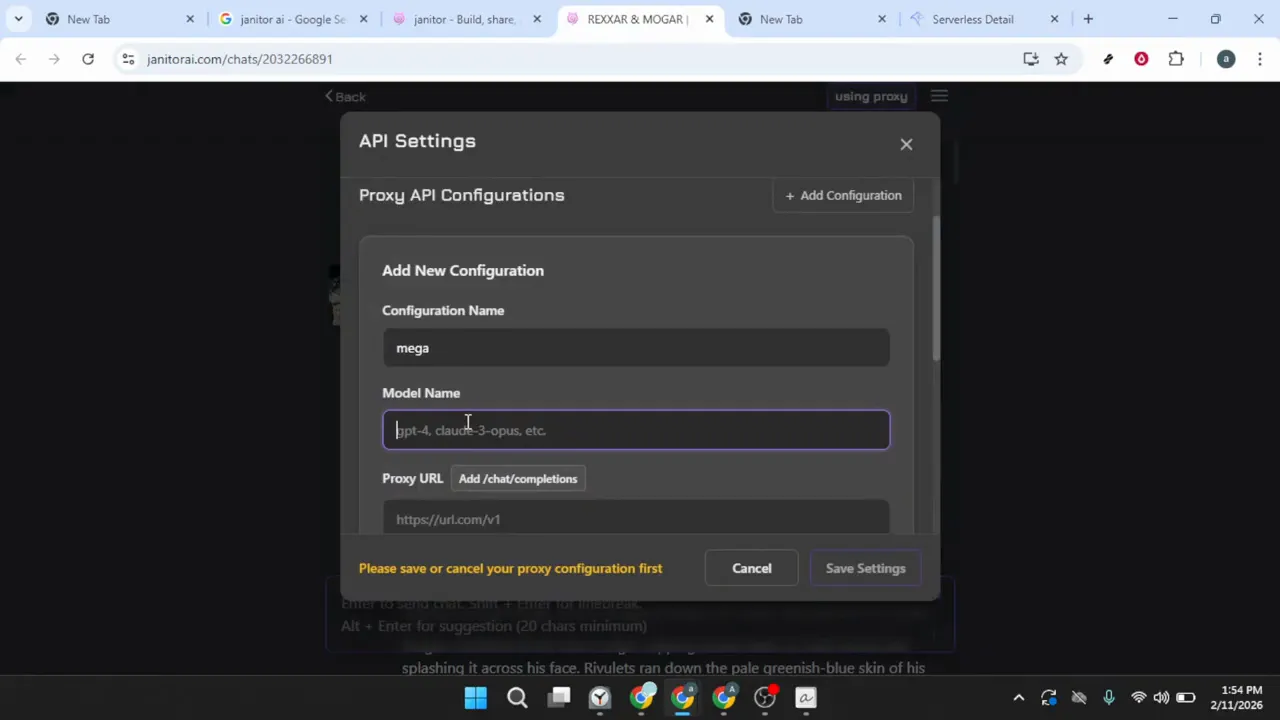
Switch back to the Janitor AI browser tab where your proxy configuration form is open. Locate the Model Name field within the configuration form and click inside it. Paste the model name you just copied from MegaNova using Ctrl+V (Windows/Linux), Cmd+V (Mac), or right-click and select Paste.
Visually verify that the model name appears complete and correct with no extra spaces before or after the text. Extra whitespace is a common source of configuration errors that prevent the proxy from functioning.
Switch back to your MegaNova browser tab, ensuring you remain in the API section. Look for a field labeled API Endpoint, Base URL, Endpoint URL, or similar terminology. This URL is the web address that Janitor AI sends requests to when using the proxy, typically appearing as a standard web address beginning with "https://" followed by a domain name and possibly a path, such as "https://api.meganova.ai/v1".
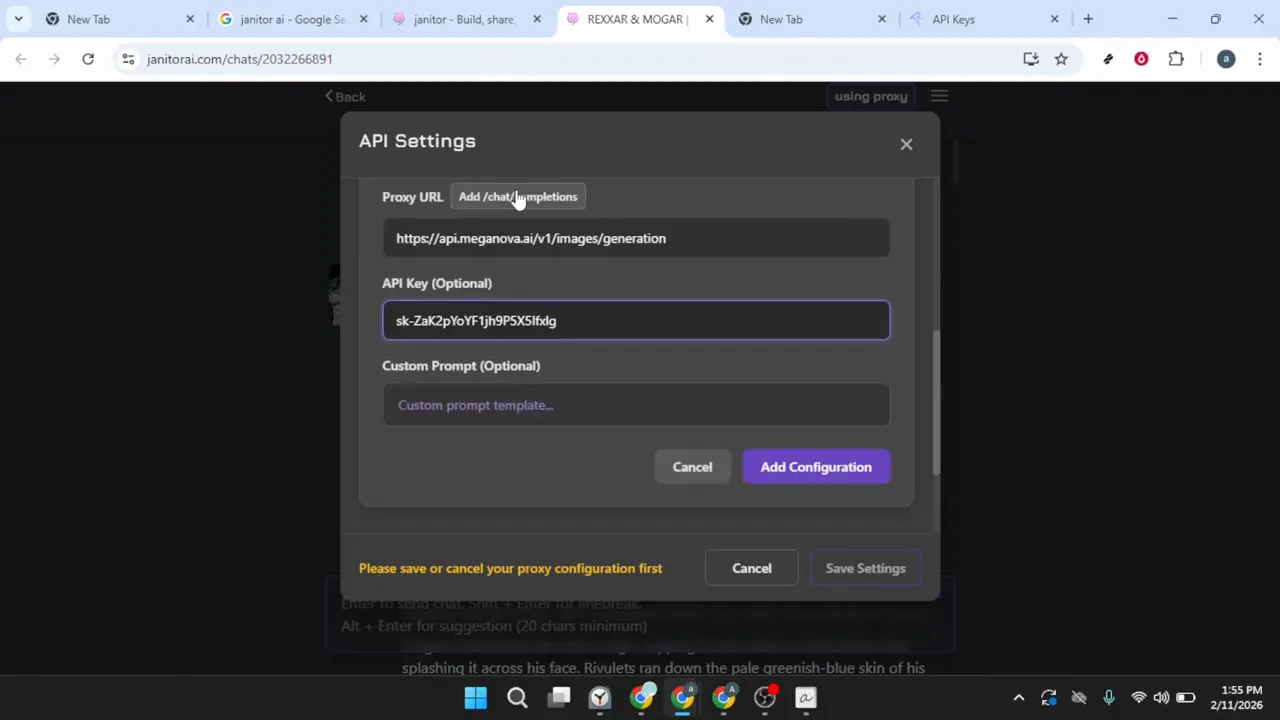
Carefully select and copy this entire URL from MegaNova. Return to the Janitor AI configuration form and locate the field labeled Proxy URL or URL. Paste the copied URL into this field, checking for accuracy and ensuring no extra characters or spaces were accidentally included.
Within the proxy configuration area in Janitor AI, look for an option, button, or field related to "endpoint path" or "completions endpoint." The video demonstrates clicking an option to "add /chat/completions" at the [1:23–1:54] timestamp. This endpoint path specification tells Janitor AI exactly which API endpoint to call for chat functionality.
If you see a button labeled Add /chat/completions or similar, click it. If you see a text field for the endpoint path, manually enter "/chat/completions" (without quotes). This path is a standard OpenAI-compatible endpoint format that many AI services support, ensuring requests route properly to MegaNova's chat completion system.
Add the API Authentication Key
The final piece of information needed is your API key, which serves as your authentication credential for accessing MegaNova's services through the proxy.
Click the API Keys section to view your authentication credentials.
Once you can see an API key displayed, locate the copy icon (usually depicted as two overlapping squares or a clipboard symbol) next to the key.
The final piece of information needed is your API key, which serves as your authentication credential for accessing MegaNova's services through the proxy. Switch back to your MegaNova browser tab. In the API section, look for a subsection or menu item specifically for API Keys or Authentication Keys.
Click the API Keys section to view your authentication credentials. MegaNova may display one or more API keys depending on whether you've generated any previously. If you don't see any keys listed, look for a button labeled Create New Key or Generate API Key and click it to create one.
Once you can see an API key displayed, locate the copy icon (usually depicted as two overlapping squares or a clipboard symbol) next to the key. Click this copy icon rather than manually selecting the key with your mouse. Using the copy function ensures you capture the entire key without accidentally missing characters at the beginning or end.
API keys are sensitive credentials that grant access to your MegaNova account. Never share your API key publicly, in screenshots, or in online forums. Treat it with the same security consideration you would give to a password.
Return to the Janitor AI configuration form and locate the field labeled API Key or Authentication Key. Click inside this field and paste your copied API key using Ctrl+V (Windows/Linux), Cmd+V (Mac), or right-clicking and selecting Paste. This step appears at the [1:54–2:22] mark of the video.
After pasting, verify that the entire key appears in the field with no truncation. API keys are typically long strings of random characters, so visual verification of the complete key is important for successful authentication.
Save the Proxy Configuration
With all four critical pieces of information now entered—the configuration name, model name, proxy URL with endpoint path, and API key—you're ready to finalize the setup.
Click this button to register your new proxy configuration with Janitor AI.
After the configuration is added, it appears in a list of available proxy configurations within the Proxy Settings section.
With all four critical pieces of information now entered—the configuration name, model name, proxy URL with endpoint path, and API key—you're ready to finalize the setup. Look for a button at the bottom of the configuration form labeled Add Configuration, Create Configuration, or similar terminology.
Click this button to register your new proxy configuration with Janitor AI. The system validates the information you've entered and adds this configuration to your available proxy options. You may see a brief loading indicator while Janitor AI processes your new configuration.
After the configuration is added, it appears in a list of available proxy configurations within the Proxy Settings section. However, simply adding the configuration doesn't activate it for use. You must explicitly save your settings to apply this configuration as your active proxy.
Look for a button labeled Save Settings or Apply Changes, typically located at the top or bottom of the API Settings area. This button may be in a different location than the Add Configuration button you clicked previously. Click Save Settings to finalize all changes and activate your new proxy configuration.
After clicking Save, you should see a confirmation message indicating that your settings have been successfully saved. This confirmation might appear as a popup notification, a banner at the top of the screen, or a brief success message. This final step corresponds to the [2:22] mark of the video where the configuration process is completed.
Your Janitor AI instance is now configured to route all chat requests through MegaNova's free proxy service. When you send messages to characters in Janitor AI, the platform uses MegaNova's AI model to generate responses using the credentials you've provided.
Troubleshoot Common Configuration Issues
If you've completed all steps but the proxy isn't working correctly when you attempt to chat, several common issues are easy to fix.
Check the Model Name field for any spaces before the first character or after the last character.
The API key is particularly prone to copying errors because of its length.
If you've completed all steps but the proxy isn't working correctly when you attempt to chat, several common issues are easy to fix. The most frequent problem is extra whitespace or missing characters in the credentials you've pasted from MegaNova. Return to your Proxy Settings in Janitor AI and carefully examine each field.
Check the Model Name field for any spaces before the first character or after the last character. These invisible characters often get copied accidentally and prevent the system from recognizing the model. Similarly, inspect the Proxy URL for completeness—verify it includes the "https://" at the beginning and doesn't have truncation at the end.
The API key is particularly prone to copying errors because of its length. If your configuration isn't working, return to MegaNova and copy the API key again using the copy icon. Delete the existing key in Janitor AI's field and paste the fresh copy.
Verify that you've added the "/chat/completions" endpoint path as described in the configuration steps. Without this specific path, Janitor AI won't know which API endpoint to call, resulting in failed requests. Double-check that this path is present and correctly formatted.
After making any corrections to your configuration fields, click Save Settings again to apply the changes. Simply editing the fields without saving won't update your active configuration. Once you've saved the corrected settings, send a test message to a character to verify that the proxy connection is now working properly.
Copy-paste prompts that work
Each prompt has been tested and optimized for this workflow. Customize the bracketed sections.
Help me troubleshoot my Janitor AI proxy connection. I've entered all the configuration details but the system isn't connecting to MegaNova.
Walk me through the steps to create a second proxy configuration in Janitor AI using a different MegaNova model.
What should I do if I see a 'rate limit exceeded' error when using my Janitor AI proxy with MegaNova?
How do I verify that my Janitor AI proxy is successfully connected to MegaNova before sending important prompts?
My MegaNova API key was regenerated. How do I update my Janitor AI proxy configuration with the new key?
What are the differences between setting up a direct API connection versus using a proxy in Janitor AI?
Janitor AI Technical Specifications
| Free Tier | ✓ Yes |
| Api Access | ✗ No |
| Mobile App | ✓ Yes |
| Voice Mode | ✗ No |
| Web Search | ✗ No |
| File Upload | ✗ No |
| Code Execution | ✗ No |
| Context Window | Unknown |
| Image Generation | None |
| Plugins Extensions | ✓ Yes |
| Context Window Desc | The platform does not publish a specific token or word limit for JanitorLLM. |
Common issues
Go further
This matters when MegaNova releases new model versions or when you want to compare response quality between different model configurations while maintaining stable credentials for each.
Key rotation is a best practice for any API credential management, and updating it in Janitor AI only takes 30 seconds, making it a worthwhile habit for maintaining account security.
This becomes especially valuable if MegaNova changes their dashboard interface or if you're helping friends set up their own proxy connections and can quickly reference the correct endpoint format.
More tutorials
Works well with this
Zapier can automate workflows involving Janitor AI and external APIs, useful for integrating proxy-based conversations with other services.
n8n enables low-code workflow automation that can connect Janitor AI proxy setups with other applications and data sources.
Claude offers an alternative AI model that can be compared with MegaNova's capabilities or used alongside proxy configurations for different conversational needs.
This tutorial was created by Joshua Kishaba and produced using AI-assisted editorial tools. All recommendations reflect genuine editorial opinion based on hands-on testing. This page may contain affiliate links — see our full disclosure.